Cluttered kitchen cabinets waste space and make cooking frustrating. Whether someone’s dealing with a cramped apartment kitchen or simply can’t locate that one pan, poor cabinet storage derails daily routines. The good news: smart organization doesn’t require a gut renovation or expensive custom cabinetry. With the right storage solutions, vertical shelving, drawer dividers, door racks, and labeling systems, anyone can reclaim cabinet real estate and streamline their kitchen. This guide covers practical kitchen cabinet storage solutions that maximize every inch and actually stay organized long-term.
Key Takeaways
- Start with a thorough audit and measurement of your cabinet space—measuring width, depth, and height prevents costly mistakes and ensures organizers fit properly.
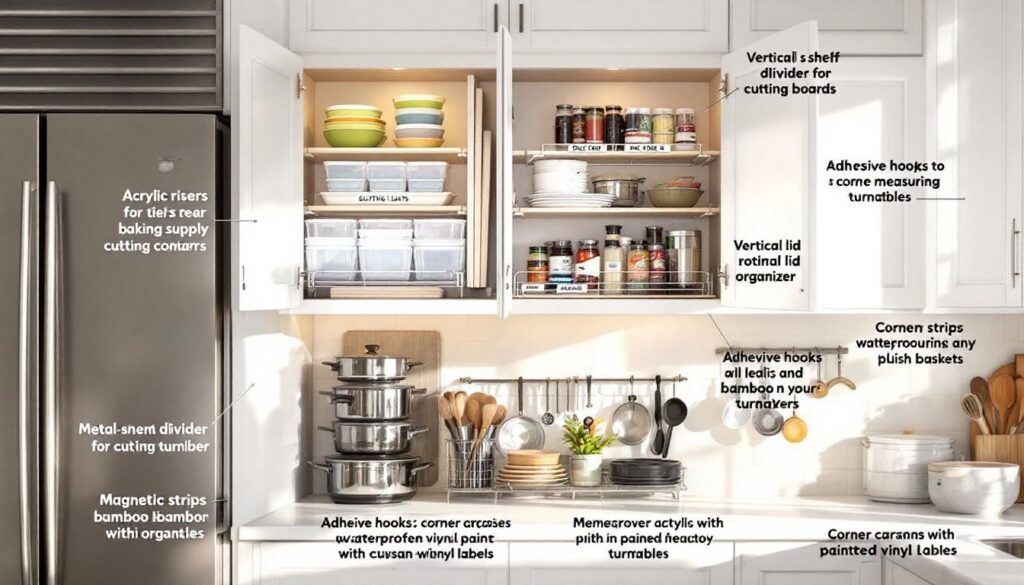
- Vertical shelving and dividers transform kitchen cabinet storage by doubling usable square footage and keeping items like plates and cutting boards organized and accessible.
- Drawer organizers and tiered riser systems ($15–$50) turn chaotic junk drawers into functional zones, with adjustable dividers working especially well for utensils, spices, and baking supplies.
- Maximize cabinet door and inside-wall surfaces with adhesive hooks, magnetic strips, and corner shelves to create free storage without permanent installation.
- Lazy Susans and rotating racks eliminate awkward reaching in deep cabinets by bringing items within arm’s reach with a simple spin.
- Label everything with waterproof labels and schedule quarterly audits to maintain your organization system long-term and prevent clutter from returning.
Assess Your Current Cabinet Space
Before buying organizers, measure and audit what’s actually inside. Open every cabinet and drawer, pull everything out, and be honest: What gets used weekly? What’s taking up space but rarely comes out? This brutal inventory prevents wasted money on solutions for items that should just be donated.
Measure cabinet interiors in three dimensions, width, depth, and height from the top shelf to the bottom. Account for the clearance needed when doors swing open: a tall organizer might block the door or interfere with adjacent cabinets. Jot down which cabinets are near heat sources (avoid plastics above the stove) and which are in humid zones near the sink (metal or sealed wood organizers perform better there).
Note the vertical space above existing shelves. Many standard kitchen cabinets have 12 to 15 inches of clearance between shelves, enough room for tiered risers or short stackable containers. Understand where the deepest, hardest-to-reach spots are (usually the back corners and the very bottom shelf). These spots are perfect for infrequently used items or pull-out solutions that bring items to you instead of forcing awkward reaching.
Group items by category, baking supplies, pots and pans, glassware, canned goods, small appliances, and consider where they’re actually used. Keep frequently used items at eye level and within arm’s reach of prep areas. Store heavier items like cast iron lower to reduce strain and safety risk. This mental map guides placement and prevents the classic mistake of organizing without a plan, only to reorganize six months later.
Install Vertical Shelving and Dividers
Vertical storage is the most underutilized tool in crowded cabinets. Most standard cabinets have one or two fixed shelves and wasted air space above. Adding shelves, either removable or permanently affixed, instantly doubles usable square footage.
Adjustable shelving systems work best. These use pins or rails to support shelves at custom heights, letting someone accommodate everything from stocky jars to tall bottles. Stainless steel or heavy-duty plastic options both work: avoid cheap particleboard, which sags under weight and deteriorates in humid cabinets. Measure cabinet interior width carefully, shelves must fit snugly without forcing or binding doors. If the cabinet interior is exactly 34 inches wide and the shelf is 34 inches, it won’t slide in: aim for a half-inch clearance.
Shelf dividers and vertical file organizers solve the classic stack problem. Stacked plates or baking sheets slide off constantly. A simple divider, even a thin wire or plastic insert, keeps them upright and accessible, turning a chaotic pile into a neat vertical file. Wire dividers are easier to remove and clean: acrylic ones look polished but cost more. For items like cutting boards or sheet pans, dividers prevent damage and let someone grab what they need without toppling the rest.
For permanent installations, wood strips or metal rods can be fastened to cabinet sides using bracket clips. This works for deep cabinets holding pots and pans. A rod suspended across the width creates a perfect hanger point for measuring cups or utensils. Always ensure brackets are rated for the weight, read the product specs before installation. Overtaxing brackets causes shelves to sag or fail suddenly.
Use Drawer Organizers and Tiered Systems
Junk drawers are the product of laziness and lack of bins. Drawer organizers, divided trays, foam inserts, or expandable dividers, cost $10 to $50 and transform chaos into function. Measure drawer width, depth, and height first. Organizers that don’t fit properly shift during use and undo all the work.
Expandable dividers adjust to almost any drawer size and hold items upright: utensils, tea bags, small tools, batteries. They’re adjustable, so when needs change, the organizer adapts. Bamboo or wooden drawer inserts look nicer and handle moisture better than plastic, though they cost more. For deep drawers, skip single-layer inserts and go with a tiered riser system, essentially small shelves within the drawer that create upper and lower storage zones.
Tiered stackable trays work especially well for baking supplies, spices, or packaged snacks. A 3-tier plastic riser ($15–$30) fits inside a cabinet or deep drawer, creating three horizontal levels without permanently altering the cabinet. Small containers or jars stack on each tier, instantly tripling vertical capacity in a 12-inch-tall space. Acrylic or clear plastic makes it easy to see what’s inside without opening everything.
For drawers that hold pots, lids, and pans, consider adjustable dividers rated for heavier loads. Standard plastic dividers flex under weight: look for dividers with metal reinforcement or solid construction. Separate pot lids into their own drawer or stack them on edge using a similar divider system. Lids stored flat or stacked flat waste enormous space and crack easily.
Implement Door and Inside-Wall Storage
Cabinet doors are prime real estate often left bare. The inside surface of a cabinet door can hold lightweight items using adhesive hooks, magnetic strips, or shallow shelves, effectively creating free storage with zero installation complexity.
Adhesive hooks ($0.50 to $3 each) work on painted wood but perform better on smooth surfaces. Apply them to the inside of cabinet doors to hang dish towels, measuring spoons, or lightweight tools. They typically hold 2–5 pounds depending on quality: don’t overload. Remove them carefully by pulling slowly and heating the adhesive slightly with a hair dryer to minimize damage.
Magnetic strips suit spice jars, metal measuring cups, or knives if the cabinet interior has metal support. Some cabinet doors are solid wood with no metal backing: verify first by attempting to stick a magnet. If it doesn’t hold, magnetic solutions won’t work.
Over-the-door organizers, the thin hanging racks with pockets, hang from the top frame of a cabinet door. These hold spices, packets, or small containers. They add an inch or two of depth, so verify the cabinet will still close properly. Deep cabinets handle this fine: narrow cabinets may have clearance issues.
Inside-wall corner shelves address the awkward triangular dead zones in corner cabinets. A lazy susan-style shelf or corner carousel (discussed more in the next section) works here too. Alternatively, small adhesive shelves ($8–$15) mount inside corners and hold small jars or supplies. They’re permanent once installed, so plan placement carefully.
Employ Lazy Susans and Rotating Racks
Deep cabinets with poor sightlines frustrate everyone. Reaching to the back of a 24-inch-deep cabinet means getting down, peering in, and stretching. A lazy susan or rotating rack eliminates that frustration by bringing items within arm’s reach via a simple spin.
Basic turntables ($8–$20) suit spices, condiments, or small jars. Spin the turntable, and everything rotates into view without rearranging or hunting. Metal or wood bases resist moisture better than plastic: plastic works fine in dry cabinets. Match the turntable diameter to the cabinet width, leaving an inch on each side for the spin radius. A 12-inch turntable fits snugly in a 14-inch-wide cabinet.
Tiered lazy susans ($15–$40) stack two or three turntables at different heights, quadrupling capacity in the same footprint. These work especially well for spice collections or jars. Weight is the constraint: overload them, and they spin sluggishly or bind. Stick to lightweight items and avoid stacking heavy pots or dense supplies.
Corner carousels are the premium solution for corner cabinets. These rotating shelves pivot from the corner, presenting items at shoulder level without contorting. Installation varies: some are adhesive-mounted, others are shelf-mounted, and a few require light drilling. Cost ranges from $40 to $150 depending on mechanism quality and size. For frequently accessed corners, the investment pays dividends in ease of use.
Ensure rotating racks sit level. A crooked turntable spins unevenly or won’t return to center. Use a level (any standard 24-inch model works) to verify before filling. If the cabinet itself is uneven, shim the turntable base with thin rubber pads until it sits truly level.
Label and Maintain Your Organization System
The best organization fails without labeling and maintenance. Labels are the invisible force that keeps organized cabinets from slowly reverting to chaos. A label printer, a pen, or even a label maker ($15–$35) creates consistency and ensures everyone in the household replaces items correctly.
Waterproof labels are essential. Regular paper labels peel off in humid cabinets near the sink: vinyl or plastic labels stick and last. Thermal label printers (like a Brother label maker) cost $30–$60 and produce small durable labels in seconds. For minimal investment, a permanent marker and painter’s tape work fine: write the item name and use date, stick it on, and replace as needed.
Label not just the container but also the expiration date or use-by date on packaged goods. This prevents that moment six months later when someone finds an unlabeled jar and wonders if it’s still good. Baking supplies like flour, sugar, and spices degrade over time: dating them removes guesswork.
Schedule a quarterly audit (every three months) to purge expired items, review what’s actually being used, and reorganize as needed. This 30-minute task prevents the slow creep of clutter. If something hasn’t been touched in a year, it’s taking up space for no reason. Donate unopened packaged goods to food banks: compost or safely dispose of expired items.
Keep a simple inventory list on the fridge or in a notes app if the household shares cooking duties. Jot down low-stock items to prevent overbuying or running out. This habit costs nothing but prevents duplicate purchases and ensures the organization system actually serves its purpose.
Conclusion
Kitchen cabinet storage solutions don’t need to be fancy or expensive. Start by honestly assessing what’s there, then layer in vertical shelving, drawer dividers, door storage, and rotating racks to reclaim space. The real payoff comes from labeling, maintaining consistency, and scheduling occasional audits. A well-organized cabinet saves time, prevents food waste, and makes cooking more enjoyable. Take it one cabinet at a time, measure carefully, invest in durable organizers, and stick to the system. Most kitchens can transform with under $200 and a weekend of work.