Proper uniform storage is more than just hanging clothes on a rod, it’s about extending their lifespan, maintaining readiness, and maximizing every inch of closet space. Whether managing work uniforms, athletic gear, or multiple sets for military or hospitality roles, the right storage system prevents wrinkles, protects fabrics from damage, and makes getting ready quick and stress-free. This guide walks through practical, budget-friendly solutions that work in closets large and small, helping anyone keep uniforms organized, accessible, and in top condition for years to come.
Key Takeaways
- Proper uniform storage solutions extend garment lifespan, prevent wrinkles and color fading, and reduce time spent on maintenance and ironing.
- Invest in heavy-duty hangers with shoulder grooves, clear plastic bins with secure lids, and garment racks to maximize storage capacity and keep uniforms wrinkle-free.
- Maintain optimal storage conditions between 50–70°F and 30–50% humidity using moisture absorbers and avoiding direct sunlight to prevent mildew and fabric deterioration.
- Use a rotation system where clean uniforms move to the front while worn items go to the back, ensuring even wear and preventing overuse of single sets.
- Maximize small closets with double hanging rods, over-the-door organizers, wall-mounted shelving, and slim rolling carts to efficiently store multiple uniforms in tight spaces.
- Keep uniforms work-ready by dedicating time to quick repairs weekly, maintaining a clean-item inventory of at least three ready sets, and separating clean garments from those needing laundering.
Why Proper Uniform Storage Matters
Uniforms, whether police, medical, culinary, or aviation, represent both a daily investment and a professional responsibility. Improper storage leads to preventable problems: wrinkles that take extra pressing time, color fading from light exposure, mold or mildew growth in damp closets, and premature fabric deterioration. A disorganized closet also wastes time each morning hunting for clean, wrinkle-free sets when you should be getting out the door.
When uniforms are stored correctly, they maintain their appearance longer, require less maintenance, and stay ready to wear. This translates to real savings, fewer garments to replace, less energy spent on ironing, and reduced laundry cycles. For those with multiple uniforms, proper organization also ensures rotation, so no single set gets overworked while others sit forgotten.
Beyond functionality, clear, accessible storage reduces stress. A professional knows their uniform is clean, pressed, and ready when needed. That confidence starts with a simple, reliable storage system.
Choosing the Right Storage Containers and Systems
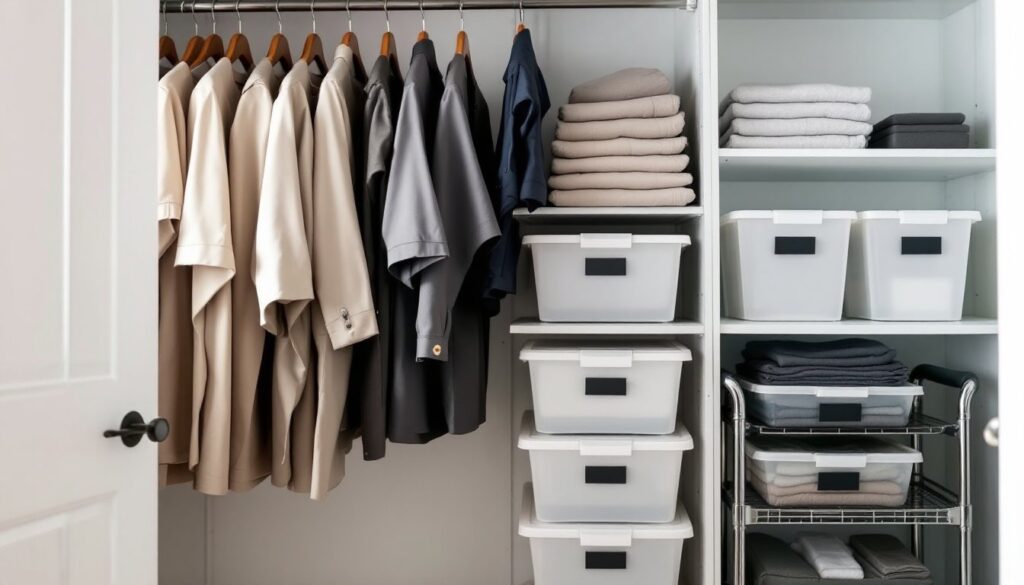
The foundation of any uniform storage system is selecting the right containers and hanging hardware. For shelved or stacked uniforms, use clear plastic storage bins (opaque ones force you to open and dig), preferably with secure lids to block dust and moisture. Bins with handles make rotating stock easier, and stackable designs save floor space in closets or shelving units.
For hanging storage, invest in heavy-duty hangers suited to the weight of your uniforms. Wooden or plastic hangers with shoulder grooves prevent creasing better than thin wire hangers. Velvet or non-slip hangers grip fabric without leaving marks and keep clothes from sliding off, especially helpful for synthetic blends or heavier pants.
Consider a garment rack for additional hanging capacity if closet space is tight. A sturdy metal rack ($40–$100) can hold 20+ uniforms and fits in a bedroom corner or closet. For frequent rotations, a rolling rack makes sense: stationary units work for long-term storage.
If using drawers, drawer dividers or small bins create compartments so items don’t jumble together. This keeps folded uniforms visible and prevents unnecessary digging that causes wrinkles. For smaller spaces, vertical storage solutions, like shelves above the closet rod or under-bed containers, maximize capacity without eating floor space.
Best Practices for Hanging and Folding Uniforms
The choice between hanging and folding depends on uniform type and available space. Shirts, jackets, and structured garments belong on hangers to prevent creasing and maintain shape. Hang them shoulder-width apart to avoid crowding: uniforms jammed together wrinkle and trap odors. Always use hangers with smooth surfaces, avoid thin wire models that dig into seams.
For trousers, fold them lengthwise (seams aligned) or hang them with clip hangers on the waistband, never over the legs. Clip hangers distribute weight evenly without creating stress points. Skirts should hang freely or be folded flat on shelves, depending on material and length.
Folding works well for knits, underwear, or items stored in bins. Fold uniforms in a consistent direction and stack them vertically (like a file system) so you see each piece without disturbing the pile. Horizontal stacking creates pressure on bottom items, causing wrinkles and making retrieval harder.
A practical tip: separate work-ready uniforms (cleaned, pressed, ready to wear) from those needing laundering. Use a small laundry hamper or designated bin in the closet so clean uniforms aren’t mixed with dirty ones. Label it clearly so household members don’t confuse the two.
Climate Control and Preservation Tips
Temperature and humidity are silent enemies of uniform longevity. Moisture causes mildew, color fading, and fabric breakdown: heat accelerates all three. Keep your storage area cool and dry, ideally between 50–70°F and 30–50% humidity. Avoid basements prone to dampness or attics that heat up seasonally.
If your closet tends to be humid (common in bathrooms or coastal areas), add a moisture absorber, silica gel packs, calcium chloride containers, or a small electric dehumidifier. Replace silica gel when it becomes saturated: calcium chloride containers last longer and are more reliable. Check humidity levels monthly, especially before storing uniforms for extended periods.
Keep uniforms away from direct sunlight, which fades colors over time. Use opaque bins or curtains on closet rods to block light. For long-term storage (seasonal uniforms, dress uniforms), add cedar chips or moth balls to prevent insect damage. Cedar is gentler and smells better: moth balls work faster but require airing out uniforms before wearing.
Don’t store uniforms in plastic garment bags for months, they trap moisture. Use breathable fabric covers instead, or simply fold them loosely in bins with lids. Good air circulation prevents mildew even in cool, dry spaces.
Space-Saving Solutions for Small Closets
Small closets demand smart vertical thinking. Install a double hanging rod (two rods stacked at different heights) to double capacity without floor footprint. One rod holds longer items (jackets, dresses): the lower rod holds folded shorter pieces or doubled-up shirts. Over-the-door shoe organizers work for pants, socks, or undergarments, each pocket holds one folded item.
Use vacuum storage bags for off-season uniforms. These compress items to about 25% of original size and seal out air and moisture. Downside: bags take time to fill and refill, so they work better for seasonal rotation than daily access. Label bags clearly before sealing.
Wall-mounted shelving above the closet rod adds storage without expanding the closet footprint. Keep bins on these shelves for uniforms worn less frequently. Under-bed containers work for backup sets or off-season storage if the space is dry and accessible.
A slim rolling cart (15–20 inches wide) fits between closet walls or beside a doorframe, holding multiple drawers of folded uniforms. Wheels allow easy repositioning for cleaning, and narrow depth doesn’t obstruct walkways. This setup costs $40–$80 and typically fits 40+ pieces.
Maintenance and Quick-Access Organization
Organization means nothing if you can’t find what you need in a rush. Create a rotation system where clean uniforms move to the front and worn items go to the back. This prevents any single set from overuse and ensures even wear across your collection. Use colored hangers or labels to mark which set is due for laundering next.
Store uniforms ready to wear: pressed, mended, and with all buttons and zippers intact. Dedicate 15 minutes weekly to quick repairs, a loose button or zipper takes seconds to fix now, hours to handle later when you discover it getting dressed. Keep a small sewing kit in the closet for on-the-spot fixes.
Maintain a clean-item inventory. Count clean uniforms at the start of each week. If you’re down to one set, launder immediately rather than waiting until you’re out of options. Most professionals need at least three ready sets for 7–10 day rotation, depending on wear frequency.
Label shelves or bins by uniform type and size if multiple people share storage. A simple laminated label on each bin prevents confusion and speeds up finding the right piece. For families or roommates, color-coding by person eliminates mix-ups.
Conclusion
Smart uniform storage isn’t complicated, it’s about matching your system to your lifestyle and sticking with it. The right containers, proper hanging or folding, climate control, and a clear rotation routine keep uniforms looking professional and ready to wear. Small closets are no barrier: vertical space, rolling carts, and compact bins solve most constraints. Spend an afternoon setting up your storage system now, and you’ll save time, stress, and money every day for months to come.